A Free QuickLinks Windows App from Jack
by Jack Dunning
Starting with the introduction of Windows Vista I heard complaints about the loss of the old Windows XP file tree in the Start Menu. When opening the default Start Menu in Windows Vista and Windows 7,
 "All
Programs" opens folders in place without displaying the cascading
folder/file tree structure. In Windows Vista you can return to the
Classic XP style Start Menu through Properties, but that capability was
lost in Windows 7. Furthermore, there is no Start Menu at all on the
Taskbar in Windows 8, although it has returned in Windows 10.
"All
Programs" opens folders in place without displaying the cascading
folder/file tree structure. In Windows Vista you can return to the
Classic XP style Start Menu through Properties, but that capability was
lost in Windows 7. Furthermore, there is no Start Menu at all on the
Taskbar in Windows 8, although it has returned in Windows 10.I like the Favorite Links section of the navigation pane of Windows File Explorer which was first introduced with Windows Vista. (Note: The name Windows Explorer was changed to File Explorer in Windows 8 and continues in Windows 10. To save (or cause) confusion I use the term Windows File Explorer which opens with
 +E
in all versions of Windows.) Favorite Links appears to have changed to Quick Access in Windows 10.
+E
in all versions of Windows.) Favorite Links appears to have changed to Quick Access in Windows 10.I used to slip key editorial folders in and out of Favorite Links (Quick Access) every week. However, it is fairly limited in space and only available after opening Windows File Explorer. What if an AutoHotkey script offered easy to access a pop-up menu similar to the always-available Windows' right-click menu, easy to use, organized by category, and tailored to open those folders, programs, and Web sites you use most. ComputorEdge is now offering a free app which does just that (see Figure 1). This app might replace some of the inadequacies in the Windows Start Menu and the confusion create by loading the Taskbar with numerous (uncategorized) quick launch buttons.
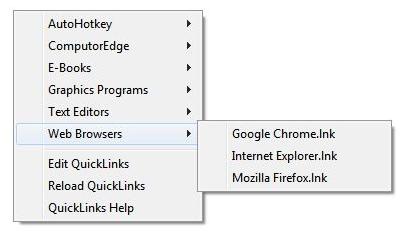
Figure 1. QuickLinks is a Windows pop-up menu which can be tailored with categories of programs, Web pages, folders, and documents. Activated with WIN+Z, ALT+Comma (for left-handed people), or a click of one of your extra mouse buttons.
I'm sure that there are many such apps freely available for Windows computers, but this one was built for its simplicity, plus ease of setup and use. There is no installation program and it runs in all versions of Windows—including Windows 8 Desktop. Simply download it, extract it from the ZIP file, and double-click on the filename to load. More importantly, since I wrote it, so I know that there is nothing in it that will hurt your computer system.
Yes, I wrote the short script in AutoHotkey—my obsession—but you don't need to know anything about AutoHotkey. You don't have to install AutoHotkey on your computer or learn how to use AutoHotkey. The program is a compiled executable file (EXE) which will run without any other software or extensions. (For those of you who do want to know how it's done see Chapter Twenty-one of the book Digging Deeper Into AutoHotkey. Here's how QuickLinks.exe works. (Find the free download at the ComputorEdge Free AutoHotkey Scripts page.)
How the QuickLinks App Works
When QuickLinks.exe runs for the first time on a Windows computer (double-click the QuickLinks.exe file name extracted from the QuickLinks.zip file), it looks for a folder named QuickLinks in the individual user folder. If not found, the app automatically creates it. An icon appears in the System Tray on the Taskbar. If you hover over the icon, you will see the name of the app. If you right-click on the System Tray icon, a menu with the options Suspend Hotkeys, Pause Script, and Exit pops up. These options can be used to control the running of the AutoHotkey app.
To activate QuickLinks, hold down WIN+Z (
+Z)
or ALT+Comma (for left-handed mouse users). The QuickLinks menu
appears at the location of the mouse cursor, see Figure 2 (top).
Initially, no categories (folders) show in the QuickLinks
folder. They must be added by the user. Click on Edit QuickLinks and
the QuickLinks folder opens in Windows File Explorer, see Figure 2
(bottom).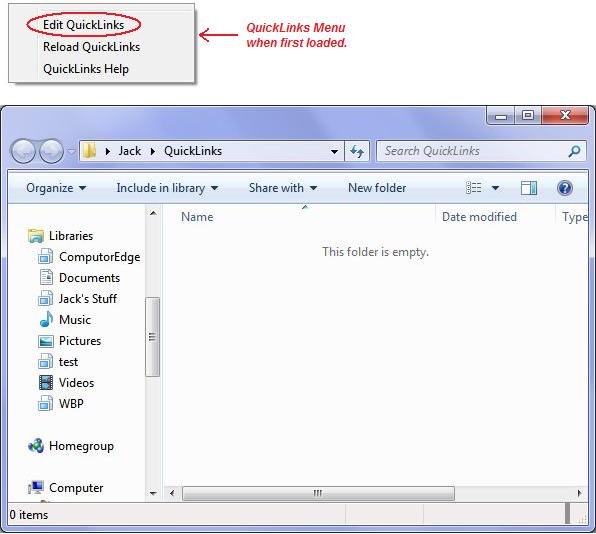
Figure 2. The first QuickLinks menu (top) has no categories. Click Edit QuickLinks to open the QuickLinks folder (bottom).
Adding Categories to QuickLinks
In its current form, QuickLinks has two levels of functionality. The first is a collection of categories used to group the links based upon the user's preferences. Each category is a folder stored in the QuickLinks folder. To define a new category, merely create and label a folder with the desired category name within the QuickLinks folder. (While the QuickLinks folder is the active window in Windows File Explorer, right-click and select New => Folder to create a new folder—or press ALT, F, W, F in order. In Windows 7, Windows 8, and Windows 10, pressing the keyboard shortcut CTRL+SHIFT+N simultaneously creates a new folder.)
Note: While anything (folders, shortcuts, documents, etc.) can be placed in the QuickLinks folder, only folders, each of which represent a category, will be read by the QuickLinks app. The links themselves must be located within the individual category folders.
The second level of functionality in QuickLinks consists of the shortcuts located within the category folders. These shortcuts can be for anything acceptable to Windows File Explorer, including programs, Web site URLs, documents, folders, etc. Folders linked within a category folder will merely open the folder. For simplicity, this version of QuickLinks does not support multiple layers of categories (folders with folders of links—and so on).
After adding a new category folder to the QuickLinks folder, select Reload QuickLinks from the menu. This updates the menu with any changes. The next time you activate the QuickLinks menu (
+Z), the new category appears,
as shown in Figure 3 (top). Since currently no shortcuts appear in
the new category, the menu item acts as an active link for opening the
category folder. One click and that folder opens in Windows File
Explorer, see Figure 3 (bottom).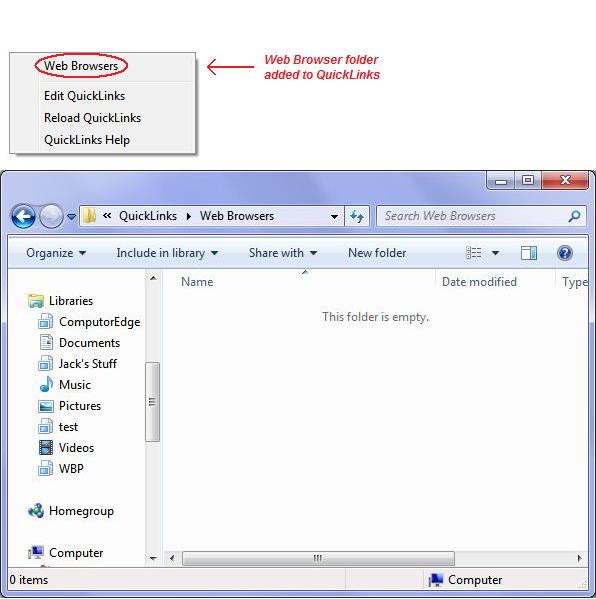
Figure 3. After reloading the QuickLinks menu, the new folder (Web Browser) appears (top). Click on an empty category and the folder opens in Windows File Explorer (bottom).
Adding Shortcuts to QuickLinks Categories
While it is possible to add any type of Windows file to a category folder, it's recommended that only shortcuts be used. I designed QuickLinks for quick access to Windows shortcuts the user wants, not a repository for programs, files, folders and other data of a more permanent nature. If programs, documents, and such are placed in a category folder, they get ignored.
There are a number of ways to add shortcuts to the category folders. Some of the easiest are by dragging an icon from one location to the category folder opened in Windows File Explorer. The hotkey for creating a shortcut for a folder or file is to hold down CTRL+SHIFT while dragging the icon to the new location. However, this can be a bit tricky if you forget to use the key combination or use the wrong combination (CTRL for move). I prefer to use a systematic approach to creating shortcuts which doesn't run the risk of displacing a program file or folder into some unknown folder location with slip of the mouse or a key. Plus, the following technique works equally as well for Web site shortcuts.
Step one, find the program, file, or folder, right-click on the file name and select Create Shortcut. Once created in Windows File Explorer, you can either copy (CTRL+C) and paste (CTRL+V) a shortcut or drag it directly to the category folder. If you need the shortcut to remain at its current location, copy it rather than dragging. When you're done, update QuickLinks by reloading the
+Z
menu.If you are looking at replicating a shortcut on the Start Menu (except Windows 10), the Taskbar, or the Desktop, then right-click and select Properties. The Properties window opens, as shown in Figure 4. (If the shortcut sits on the Taskbar in Windows 7, Windows 8, or Windows 10, hold down the SHIFT key, right-click and select Properties.) Select the Target path (with CTRL+A or highlight by clicking at the beginning of the path, holding the left mouse button, and dragging to the end) and copy it (CTRL+C or right-click => Copy). This is the program or file path used when creating a new shortcut in the QuickLinks category folder.
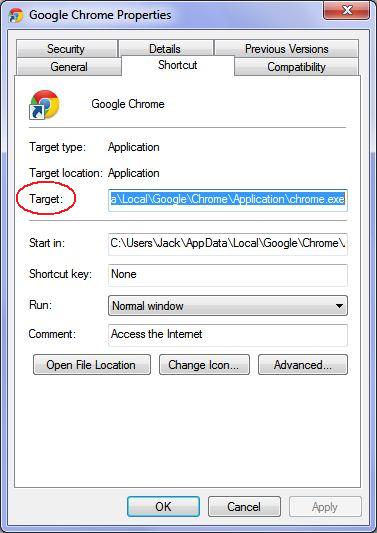
Figure 4. The Shortcut tab in the Properties window of any shortcut shows the Target path needed to create a new shortcut for a program or file. Copy this path before returning to the QuickLinks category folder in Windows File Explorer.
Note: When adding Web pages to QuickLinks open the target Web page in any browser and copy (CTRL+C) the selected (highlighted) URL located in the browser's navigation field. The following techniques for creating shortcuts work equally as well for Web page shortcuts when substituting the URL for the target path.
To create the new shortcut, return to the QuickLinks category folder in Windows File Explorer, right-click in the main file area and select New => Shortcut from the menu (see Figure 5).
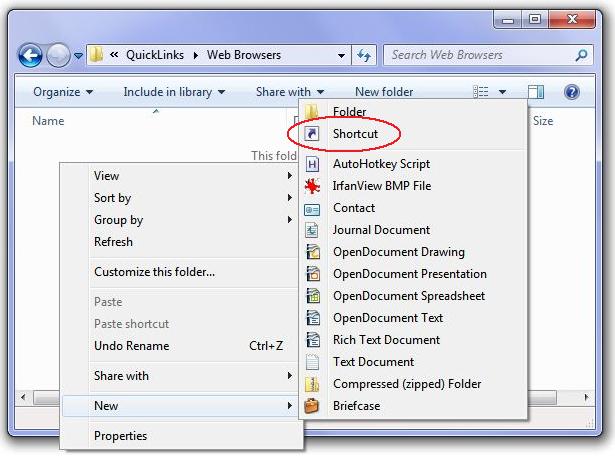
Figure 5. Right-click in the main file area of the QuickLinks category folder in Windows File Explorer, then select New => Shortcut from the menu. The Create Shortcut dialog will open.
Press the keys ALT, F, W, S successively for an alternative method for opening the same Create Shortcut dialog.
Paste the copied file path (URL for Web pages) into the "Type the location of the item:" field as shown in Figure 6, then click Next.
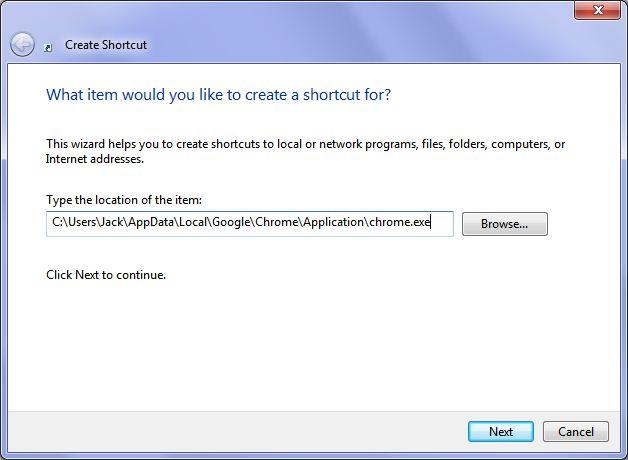
Figure 6. Paste (CTRL+V) or type the target file path or Web page URL in the location field.
In the next window, type the name you want assigned to the new shortcut (see Figure 7). This is the name which will appear in the QuickLinks menu. Clicking Finish creates the shortcut.
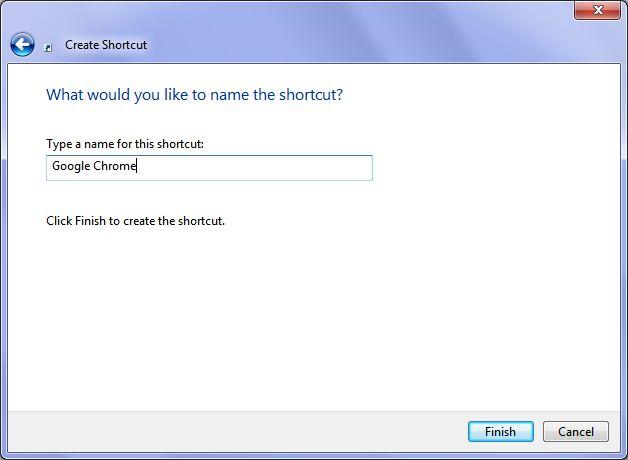
Figure 7. Type the name you want assigned to the new shortcut, then click Finish.
The QuickLinks menu does not update until the menu reloads. Activate the menu (
+Z), then select Reload QuickLinks,
as shown in Figure 8 (left). On the next +Z,
hovering over the recently changed category folder displays the new
addition(s). See Figure 8 (right).
Figure 8. Reloading the QuickLinks menu (left) causes the empty category folder link to change to a menu (right).
Continue this process of adding category folders and shortcuts within each folder, until you're satisfied with your QuickLinks pop-up menu. The top level QuickLinks folder can always be opened with Edit QuickLinks option. Figure 9 shows my personal QuickLinks folder in its current state. Each category folder has at least one shortcut within it.
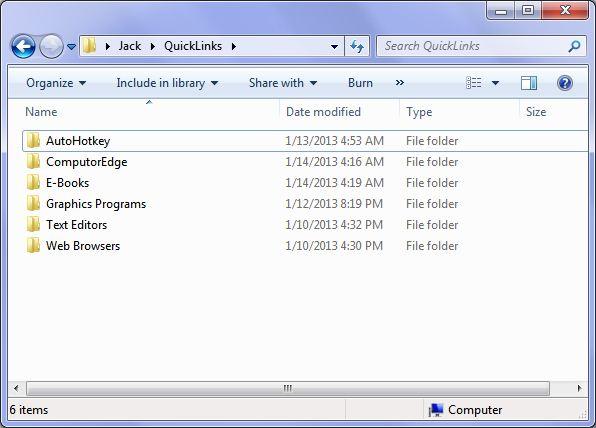
Figure 9. The QuickLinks folder open is Windows File Explorer showing the category folders.
When the QuickLinks menu activates on my computer, the links display as shown in Figure 10 (two examples shown). The QuickLinks Help option (circled in red in the bottom example) takes the user to this Web page—since it is the most extensive (and only) how-to on the topic. (September 2017: A more up-to-date image of my QuickLinks appears toward the bottom of this page.)
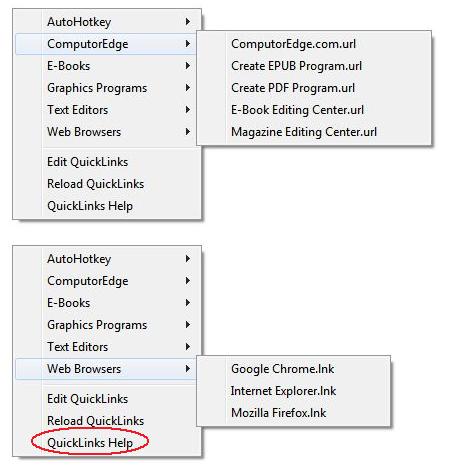
Figure 10. Two examples of Jack's personal QuickLinks menu.
Note that the link names in the category show the extensions (".url" for Web links, ".lnk" for regular shortcuts). The updated version no longer displays these extensions.
Downloading and Installing QuickLinks
If QuickLinks sounds like an app that might be useful to you, then you can download it a ZIP file QuickLinks.zip free directly from the ComputorEdge Free AutoHotkey Scripts page. You will need to save the ZIP file to your computer. (You will probably gets warning about the file coming from an unknown source. Don't worry, it's safe.) The program (EXE) file is compressed in a ZIP file and needs to be extracted. Open the ZIP folder (double click on QuickLinks.zip) to view the compressed the EXE file. To extract the QuickLinks.exe file from the ZIP folder either click "Extract all files" at the top or right-click and select "Extract All..." from the menu. See Figure 11. Save to a new or chosen folder.
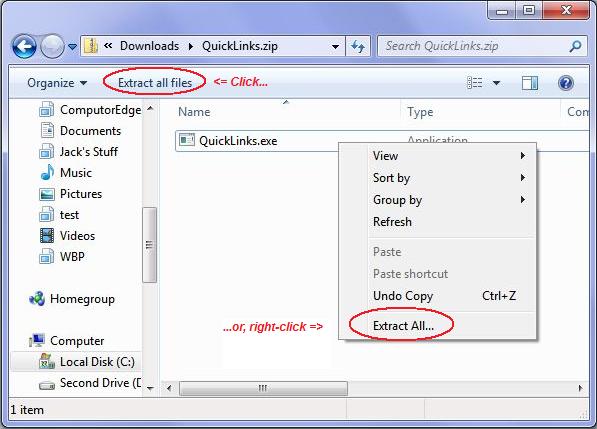
Figure 11. To extract the QuickLinks.exe file from the ZIP folder either click "Extra all files" at the top or right-click and select "Extract All..." from the menu.
After extracting QuickLinks.exe to the new location, double-click or right-click => Open to run the QuickLinks.exe file. The first time you run the program, since your computer doesn't know me, you will most likely get another warning from your security software. It's safe to run (as long as you get the app directly from my link and not some unknown source).
If you would like the QuickLinks app to run every time you use your computer, Run "shell:startup" to open the Startup folder and place the QuickLinks.exe file or a shortcut inside.
September 2017 Update: Win+Z, Alt+, (comma), and CTRL+right-click all open the QuickLinks menu. I personally use XButton1 (left extra mouse button) to activate the menu, but I needed to override the built-in setting in the software for my mouse by adding one of the other hotkey combinations.
This updated version of QuickLinks includes a number of new features.
 1. Icons are added to the menu in different ways.
First, you find the function, AddIcon(TopMenu,SubMenu), for adding icons to the top-level folders and specific shortcuts on the second level.
Second, specific IfInString command lines change/insert specific types of icons.
Third, program icons are drawn directly from EXE files.
Fourth, you can manually change shortcut icon (.lnk) in Windows (File) Explorer which then automatically appear in the menu. This does not work for Web links (.url).
Caution: If you have previously setup personalized icon statements in your version of QuickLinks.ahk, be sure to copy and transfer that icon setting code to this version. Otherwise, they may be overwritten. (In other words, backup your old copy of QuickLinks.ahk before overwriting it.)
2. QuickLinks now includes the secret Windows Tools (God Mode) link in the Tools folder for quick access to over 200 Windows settings and features. This feature automatic renews if deleted. If you don't want it, then delete the code which adds it.
Note: When editing shortcuts in Windows (File) Explorer, the name of the special Windows Tools shortcut appears blank in some versions of Windows. Do not edit or add a different name. That process disables the shortcut.
3. With the exception of the above Windows Tools folder, QuickLinks only launches .lnk and .url shortcuts.
4. You can now directly add new links to the menu by selecting a file in Windows (File) Explorer or the
address bar (URL) of a Web page and selecting Add Links with the appropriate submenu from your QuickLinks menu. You may want to later edit the shortcut in Windows (File) Explorer to change the name and possibly add a shortcut icon. Select Edit Quicklinks to open the QuickLinks folder.
The QuickLinks.ahk script acts as a sample of one of the many things that AutoHotkey can do. If you would like to look at QuickLinks.exe's inner workings, then check out Chapter Twenty-one of the book Digging Deeper Into AutoHotkey plus a number of blogs found at Jack's AutoHotkey Blog. It is a fairly short, easily modified script. I also offer ideas on how to make it multi-layered, but that gets a little nerdy. If you find any bugs (always possible in new apps), please let me know right away.
If you like QuickLinks, please share it with your friends.
* * *
See this introduction and overview AutoHotkey Tricks You Ought To Do With Windows! This e-book includes both those tips and the reference material (Table of Contents and indexes) from the other four AutoHotkey books.
* * *
 The third edition with more chapters
and an index to the AutoHotkey
commands found in the book is available in e-book format from Amazon
(and other formats—EPUB and PDF— at the ComputorEdgeBooks Web site
linked below). Jack's A Beginner's Guide to AutoHotkey, Absolutely the Best
Free Windows Utility Software Ever!: Create Power Tools for Windows XP,
Windows Vista, Windows 7 and Windows 8 (preferred, EPUB format
for iPad, Android, and computers; MOBI for Amazon Kindle; and PDF for
printing) offers a gentle approach to learning AutoHotkey. (Also
available from Amazon for
the Kindle and Kindle software on other
devices.)
The third edition with more chapters
and an index to the AutoHotkey
commands found in the book is available in e-book format from Amazon
(and other formats—EPUB and PDF— at the ComputorEdgeBooks Web site
linked below). Jack's A Beginner's Guide to AutoHotkey, Absolutely the Best
Free Windows Utility Software Ever!: Create Power Tools for Windows XP,
Windows Vista, Windows 7 and Windows 8 (preferred, EPUB format
for iPad, Android, and computers; MOBI for Amazon Kindle; and PDF for
printing) offers a gentle approach to learning AutoHotkey. (Also
available from Amazon for
the Kindle and Kindle software on other
devices.)Building Power Tools for Windows XP, Windows Vista, Windows 7 and Windows 8, AutoHotkey is the most powerful, flexible, free Windows utility software available. Anyone can instantly add more of the functions that they want in all of their Windows programs, whether installed on their computer or while working on the Web. AutoHotkey has a universality not found in any other Windows utility—free or paid.
Based upon the series of articles in ComputorEdge, Jack takes you through his learning experience as he explores writing simple AutoHotkey scripts for adding repetitive text in any program or on the Web, running programs with special hotkeys or gadgets, manipulating the size and screen location of windows, making any window always-on-top, copying and moving files, and much more. Each chapter builds on the previous chapters.
For an EPUB (iPad, NOOK, etc.) version of A Beginner's Guide to AutoHotkey click here!
For a PDF version for printing on letter size paper for inclusion in a standard notebook of A Beginner's Guide to AutoHotkey click here!
* * *
 Jack's
second AutoHotkey book, Digging Deeper Into AutoHotkey (preferred,
EPUB format for iPad, Android, and computers; MOBI for Amazon Kindle;
and PDF for printing) is comprised of updated, reorganized and indexed
columns from ComputorEdge is now available. Since the columns
were not all written in a linear fashion, the book has been reorganized
and broken up into parts by topic. The book is not for the complete
beginner since it builds on the information in A Beginner's Guide to AutoHotkey. However, if
a person is reasonably computer literate, they could go directly to
this book for ideas and techniques without the first book. (Also
available from Amazon for
the Kindle and Kindle software on other
devices.)
Jack's
second AutoHotkey book, Digging Deeper Into AutoHotkey (preferred,
EPUB format for iPad, Android, and computers; MOBI for Amazon Kindle;
and PDF for printing) is comprised of updated, reorganized and indexed
columns from ComputorEdge is now available. Since the columns
were not all written in a linear fashion, the book has been reorganized
and broken up into parts by topic. The book is not for the complete
beginner since it builds on the information in A Beginner's Guide to AutoHotkey. However, if
a person is reasonably computer literate, they could go directly to
this book for ideas and techniques without the first book. (Also
available from Amazon for
the Kindle and Kindle software on other
devices.)For an EPUB (iPad, NOOK, etc.) version of Digging Deeper into AutoHotkey click here!
For a PDF version for printing on letter size paper for inclusion in a standard notebook of Digging Deeper into AutoHotkey click here!
* * *
 Jack's
third AutoHotkey book AutoHotkey Applications (preferred, EPUB
format for iPad, Android, and computers; MOBI for Amazon Kindle; and
PDF for printing) is an intermediate level book of ideas and
applications based primarily on the AutoHotkey GUI command. The book
emphasizes practical applications. The book is not for the complete
beginner since it builds on the information in the other two books.
However, if a person is reasonably computer literate, they could go
directly to this book for ideas and techniques without the other books.
There is an extensive index to the ideas and techniques covered in the
back of the book. (Also available from Amazon for
the Kindle and Kindle software on other
devices.)
Jack's
third AutoHotkey book AutoHotkey Applications (preferred, EPUB
format for iPad, Android, and computers; MOBI for Amazon Kindle; and
PDF for printing) is an intermediate level book of ideas and
applications based primarily on the AutoHotkey GUI command. The book
emphasizes practical applications. The book is not for the complete
beginner since it builds on the information in the other two books.
However, if a person is reasonably computer literate, they could go
directly to this book for ideas and techniques without the other books.
There is an extensive index to the ideas and techniques covered in the
back of the book. (Also available from Amazon for
the Kindle and Kindle software on other
devices.)For an EPUB (iPad, NOOK, etc.) version of AutoHotkey Applications click here!
For a PDF version for printing on letter size paper for inclusion in a standard notebook of AutoHotkey Applications click here!
 This
Beginner's Guide to
Using Regular Expressions in AutoHotkey
is not a beginning level AutoHotkey book, but an introduction to using
Regular Expressions in AutoHotkey (or most other programming
languages). To get the most from this book you should already have a
basic understanding of AutoHotkey (or another programming language).
Regular Expressions (RegEx) are a powerful way to search and alter
documents without the limitations of most of the standard matching
functions. At first, the use of RegEx can be confusing and mysterious.
This book clears up the confusion with easy analogies for understanding
how RegEx works and examples of practical AutoHotkey applications.
"Regular Expressions in AutoHotkey" will take you to the next level in
AutoHotkey scripting while adding more flexibility and power to your
Windows apps. (This book is also available
at Amazon.com)
This
Beginner's Guide to
Using Regular Expressions in AutoHotkey
is not a beginning level AutoHotkey book, but an introduction to using
Regular Expressions in AutoHotkey (or most other programming
languages). To get the most from this book you should already have a
basic understanding of AutoHotkey (or another programming language).
Regular Expressions (RegEx) are a powerful way to search and alter
documents without the limitations of most of the standard matching
functions. At first, the use of RegEx can be confusing and mysterious.
This book clears up the confusion with easy analogies for understanding
how RegEx works and examples of practical AutoHotkey applications.
"Regular Expressions in AutoHotkey" will take you to the next level in
AutoHotkey scripting while adding more flexibility and power to your
Windows apps. (This book is also available
at Amazon.com)