How to Make a Pop-up Menu for Programs, Web Sites and Files
“Reading Files from Folders to Build a Menu Structure with AutoHotkey”
by Jack Dunning
I was digging around the Web looking for
another interesting AutoHotkey application when I came across the menu
structure shown in Figure 1. I was intrigued because I had looked at
all of the GUI (Graphic User Interface) objects, yet nothing resembled
this. The pop-up has the look of a standard right-click menu, but is
obviously tailored for a specific AutoHotkey task. The person posting
the image raved about how it was helping his company. Unfortunately, as
is so often true on the Web, the script writer didn't even give a hint
as to how he did it.
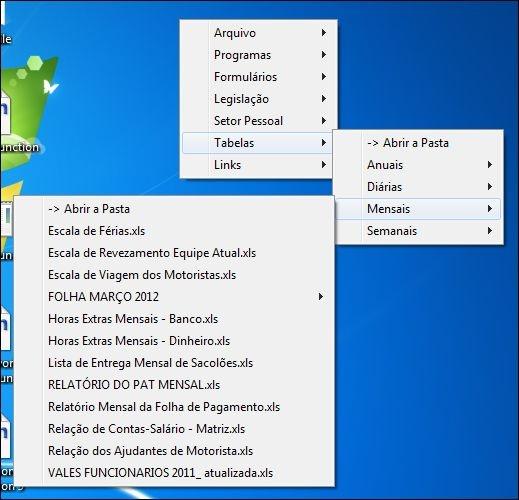 Figure 1. Sample AutoHotkey menu structure.
Armed with only the image and the knowledge that it could be done, I started reviewing (again) the AutoHotkey commands.
It didn't take very long to find the two commands crucial to this type
of menu feature. (The "commands in large font are the most commonly
used.") I soon narrowed down the application's tools to the MENU command and the LOOP command—or more specifically the LOOP (files & folders) command.
I had previously noticed the MENU command and intended to do further
investigation, but had let it slip to the back burner. Seeing an app
which navigated through files had piqued my interest. While a pop-up
menu with links might be convenient for any Windows user, this type of
app would most help Windows 8 users who no longer have a Start Menu. I
went to work on the QuickLinks app. Introduced as a free download in
this week's Windows Tips and Tricks column, the MENU and LOOP commands are the backbone of this simple app (see Figure 2).
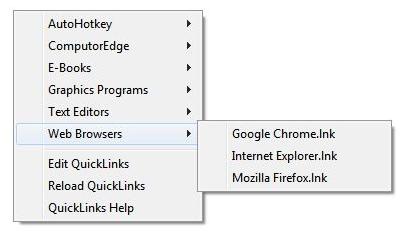 Figure 2. AutoHotkey QuickLinks.ahk menu.
While
the QuickLinks.ahk script may look short and simple to some people, it
is not a beginning level exercise. As well as the MENU command, the
code employs a LOOP within a LOOP, a few conditional IFs, and a couple
of programming tricks not well known to the novice. (For those ComputorEdge readers who are new to AutoHotkey scripts, many apps are easy to write and run on your Windows computer. See Installing AutoHotkey and Writing Your First Script.) The entire script code for QuickLinks.ahk is shown in Figure 3. Key portions of the script are highlighted with red text.
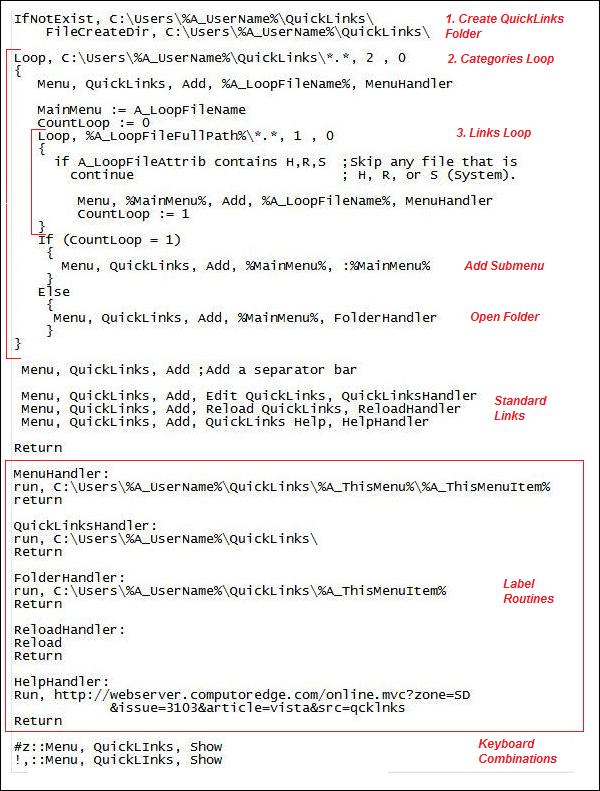 Figure 3. AutoHotkey QuickLinks,ahk script code.
Creating
the QuickLinks menu is the result of three primary steps. The first (1)
is the creation of the QuickLinks folder (if it doesn't already exist).
Second (2), the script loops through the QuickLinks folder listing only
the category folders within it while creating menu items for the top
level. Third (3), for each folder found at the top level the script
loops through its files creating links for each to add to a submenu. If
nothing is found in the subfolder, the category menu item action
defaults to opening that folder.
Next in the script, the
standard links are added at the bottom of the category menu followed by
the labels (routines) containing the action executed when an item is
selected from the pop-up menu. Lastly, the keyboard combinations are
assigned; one for right-handed people (WIN+Z) and one for
left-handed people (ALT+Comma). For those who wish to copy-and-paste
the code, the complete script (without standard boilerplate from a new
AutoHotkey, AHK , file) can be found near the end of this column.
How the QuickLinks Script Works
Since QuickLinks uses a standard folder (QuickLinks) found in the user folder, the script employs the IfNotExist command to look for it. If the folder does not exist, it is created with FileCreateDir command.
IfNotExist, C:\\Users\\%A_UserName%\\QuickLinks\\
    FileCreateDir, C:\\Users\\%A_UserName%\\QuickLinks\\
 The script immediately starts the process of scanning the QuickLinks folder with the LOOP (files and folders)
command. If there is nothing in the folder, then it skips to the end
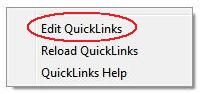
where the standard menu items are added. At this time, when activate
with one of the hotkey combinations (WIN+Z or ALT+Comma), the QuickLinks menu will appear as shown in the image at the left.
The script immediately starts the process of scanning the QuickLinks folder with the LOOP (files and folders)
command. If there is nothing in the folder, then it skips to the end
where the standard menu items are added. At this time, when activate
with one of the hotkey combinations (WIN+Z or ALT+Comma), the QuickLinks menu will appear as shown in the image at the left.
LOOP
is a powerful command for reading Windows file and folder names in
Windows File Explorer. It automatically increments through the items in
a folder providing data on each. The basic format of the command is
simply Loop followed by the path of the target files. Standard
wildcards such as "*" and "?" can be used in the folder/file path. The
first LOOP command is as follows:
Loop, C:\\Users\\%A_UserName%\\QuickLinks\\*.*, 2 , 0
{
   Menu, QuickLinks, Add, %A_LoopFileName%, MenuHandler
}
Note that the variable A_UserName
is used in the loop path. This makes the app more universal and
tailored for each user. The "*.*" is the wildcard for checking every
folder/file. The parameter 2 found after the path and comma tells
AutoHotkey to only retrieve folders. The default for this parameter is
0 which will retrieve only files. To retrieve both files and folders
the value must be set to 1. The last parameter shown (set to 0) tells
AutoHotkey not to look beyond this current folder. If set to 1, the
LOOP command will continue recursively looking into all subfolders.
The
LOOP command uses the standard curly brackets ({}) to enclose the code
executed each time the loop is incremented to the next file or folder.
In this case the primary function of the loop is to create a menu item
for each category folder. The first step in creating a menu is to ADD
the menu items. In this case, a menu item named with the folder name
(the value of A_LoopFileName, the variable which stores the name of the current folder or file) is added to a menu named QuickLinks. If this menu item, as it is now, is left on the final menu, the label (subroutine) MenuHandler,
found later in the script, would execute when clicked on the activated
menu. In this script, each category menu item is changed later
depending upon whether there are files or folders within this folder.
I
see now that I could have saved a couple of lines of code which occur
later in the script by immediately assigning the FolderHandler label
rather than MenuHandler label—which is only needed in the submenus.
It's not unusual to start down one path, then later realize that there
is a simpler way to reach your goal. A person doesn't always see all
the implications of his approach until he actually gets there. Rather
than rework it now, I'll use it as a learning point. More on that later.
Left
alone, this loop would create a menu of the folders located in the
QuickLinks folder. The next step is to add a second loop within the
first loop (inside the curly brackets of the first loop after the MENU
statement) so that each time a folder is found it immediately looks for
files within that folder:
   MainMenu := A_LoopFileName

   Loop, %A_LoopFileFullPath%\\*.*, 1 , 0
   {
     if A_LoopFileAttrib contains H,R,S  ;Skip any file that is
       continue				 ; H, R, or S.

        Menu, %MainMenu%, Add, %A_LoopFileName%, MenuHandler

   }
The variable MainMenu is created to save the name of the category item. Once within the second loop A_LoopFileName will take on the value of each item located in that folder as it increments through them. MainMenu is used as the name for the submenu when the items are added.
This
second LOOP command uses the parameter 1 to retrieve all folders and
files. Unlike the listing in Windows File Explorer, the AutoHotkey LOOP
command, when used with files, retrieves all files regardless of their
attributes—including hidden and system files. To ensure that none of
these types of files are included in the new menu, a conditional IF (if
A_LoopFileAttrib contains H,R,S) is included to skip those files by
executing the CONTINUE
command which skips the loop to the next file/folder. The H (Hidden), R
(Read Only), and S (System) parameters must be separated by commas with
no spaces between them.
The MENU command is almost identical to the command in the first loop except that MainMenu
(the category folder name) is used as the menu name rather than
QuickLinks. Once exiting the loop all of the relevant files have been
added to the menu MainMenu, but they need to be added to QuickLinks as a submenu.
Menu, QuickLinks, Add, %MainMenu%, :%MainMenu%
There
are limited number of options for types of items when adding to an
AutoHotkey menu. The first is a label (to run a subroutine) as shown in
the first couple of examples. The second is to add a menu as a submenu
to an already existing menu item. This is done by place a colon in
front of the name of the higher level menu item name (:%MainMenu%). A
menu item can either execute a label or contain a submenu—not both. The
line of code above replaces the original menu item (which includes a
label) and changes it to the prompt for a submenu. A error in this
script can occurs when no files are found inside the category folder
while attempting to add a submenu to the top level menu.
There
are a number of different ways to deal with this situation. One is to
add an item to the submenu before entering the second loop—possibly an
item which would open the category folder. Another option is to add a
toggle which would only trigger if an item is found in the category
folder. I choose the second option only because I thought of it first.
If I were doing it now, I would probably go with the first option and
add a link which opens the category folder for editing to every
submenu. (Maybe I'll do this in a future version.)
Adding a
toggle or switch is a common programming trick when the program needs
to know if a loop or conditional is entered. To implement my toggle
solution I created the variable CountLoop and set the value to 0:
   CountLoop := 0

   Loop, ...
      {
       ...
       ...
       ...
      CountLoop := 1
      }

   If (CountLoop = 1)
    {
      Menu, QuickLinks, Add, %MainMenu%, :%MainMenu%
    }
   Else
    {
     Menu, QuickLinks, Add, %MainMenu%, FolderHandler
    }
If there is a file inside the category folder, the loop will run and set the value of CountLoop to 1. On exiting the loop, IF CountLoop
equals 1, the submenu is added to QuickLinks. If not (Else), the
category menu is set to the label FolderHandler which will cause the
folder to open when clicked.
This is where I could have
completely eliminated the ELSE portion of the conditional by setting
the label on the first MENU statement to FolderHandler. Then that MENU
statement would only need to be changed if files are found in the
category folder, thus turning it into a submenu. Of course, I could
completely eliminate the need for the CountLoop toggle and
conditional by using the second option I mentioned above and creating
the item for editing the category folder in every submenu prior to
entering the second loop.
The third possiblity for the MENU ADD command is to add a separator bar by leaving the label/submenu space blank:
Menu, QuickLinks, Add ;Add a separator bar
The last three lines of code before the RETURN and subroutines add the menu items which appear on every QuickLinks menu:
 Menu, QuickLinks, Add, Edit QuickLinks, QuickLinksHandler
 Menu, QuickLinks, Add, Reload QuickLinks, ReloadHandler
 Menu, QuickLinks, Add, QuickLinks Help, HelpHandler
The
labels (each followed by a colon) contain the actions (subroutines)
initiated when the menu items are selected. Note that they all use the
RUN command with the exception of the one RELOAD command.
MenuHandler:
run, C:\\Users\\%A_UserName%\\QuickLinks\\%A_ThisMenu%\\%A_ThisMenuItem%
return

QuickLinksHandler:
run, C:\\Users\\%A_UserName%\\QuickLinks\\
Return

FolderHandler:
run, C:\\Users\\%A_UserName%\\QuickLinks\\%A_ThisMenuItem%
Return

ReloadHandler:
Reload
Return

HelpHandler:
Run, http://webserver.computoredge.com/online.mvc?zone=SD
            &issue=3103&article=vista&src=qcklnks
Return
The MENU command only provides three variable for returning data when a menu item is selected: A_ThisMenu (name of the menu selected), A_ThisMenuItem (name of the menu item selected), and A_ThisMenuItemPos
(numeric position of the menu item in the menu). The first two are used
in the subroutines to build the paths needed to launch the shortcuts.
Since these values are based upon the actual folder and file names, the
commands for opening the shortcuts can be built on the fly using the
same label.
The purpose of the RELOAD subroutine is to allow the update of the menu after changes are made in the folder.
The last two lines of the script set up the hotkey combinations for showing the menu:
#z::Menu, QuickLinks, Show  ;right-hand mouse
!,::Menu, QuickLinks, Show  ;left-hand mouse
The
menu will not display until the MENU SHOW command is executed. The
hotkeys were selected based upon their proximity to the right and left
hand, depending upon which hand the mouse is operated with.
The entire script is found here for copying and pasting:
IfNotExist, C:\\Users\\%A_UserName%\\QuickLinks\\
    FileCreateDir, C:\\Users\\%A_UserName%\\QuickLinks\\

Loop, C:\\Users\\%A_UserName%\\QuickLinks\\*.*, 2 , 0
{
   Menu, QuickLinks, Add, %A_LoopFileName%, MenuHandler

   MainMenu := A_LoopFileName
   CountLoop := 0
   Loop, %A_LoopFileFullPath%\\*.*, 1 , 0
   {
     if A_LoopFileAttrib contains H,R,S  ;Skip any file that is
       continue				 ; H, R, or S (System).

        Menu, %MainMenu%, Add, %A_LoopFileName%, MenuHandler
        CountLoop := 1
   }
   If (CountLoop = 1)
    {
      Menu, QuickLinks, Add, %MainMenu%, :%MainMenu%
    }
   Else
    {
     Menu, QuickLinks, Add, %MainMenu%, FolderHandler
    }
}

 Menu, QuickLinks, Add ;Add a separator bar

 Menu, QuickLinks, Add, Edit QuickLinks, QuickLinksHandler
 Menu, QuickLinks, Add, Reload QuickLinks, ReloadHandler
 Menu, QuickLinks, Add, QuickLinks Help, HelpHandler

Return

MenuHandler:
run, C:\\Users\\%A_UserName%\\QuickLinks\\%A_ThisMenu%\\%A_ThisMenuItem%
return

QuickLinksHandler:
run, C:\\Users\\%A_UserName%\\QuickLinks\\
Return

FolderHandler:
run, C:\\Users\\%A_UserName%\\QuickLinks\\%A_ThisMenuItem%
Return

ReloadHandler:
Reload
Return

HelpHandler:
Run, http://webserver.computoredge.com/online.mvc?zone=SD
            &issue=3103&article=vista&src=qcklnks
Return

#z::Menu, QuickLinks, Show
!,::Menu, QuickLinks, Show
QuickLinks Notes
One
question I asked myself was, "Why not subcategories?" The current
QuickLinks app only works at two level: the categories level and the
links within the categories.
To increase the capabilities of the
QuickLinks app means adding more complication to the script. The MENU
command only operates at two levels: menu and menu items. When a
selection is made only the name of the menu, the name of the menu item,
and menu position are available. If the menu is to drill down further
than those two levels, then unless special provisions are made for
tracking path data, the intermediate level path data will be lost. The
additional levels either need to be hard coded into the script with
specific path data or global variables (arrays) need to be created with
unique (recall-able) names.
This tracking of path data can be
done a number of different ways, but to maintain flexibility for the
user some type of array structure based upon the menu position variable
may be the best bet. That would require that the index (concatenated
string of successive levels) would need to appear in some form in the
menu item name. This is the only way that I can see to easily tie the
menu items to the array variable. An assignable variable as part of the
MENU ADD command would have resolved this issue, but that does not
appear to exist in AutoHotkey.
As another alternative, storing
more complete path information at each successive level is conceivable,
but this would require displaying that path information in the menu
itself. At each level the menu drills down, the displayed menu name
gets longer.
Another complication for adding more layers is the
handling of the increased number of LOOP commands within loops within
loops. The best option might be to put the internal loops into a
function which calls itself as it drills down through the folder tree
structure. If this is done with a function, the array variables would
need to be declared global as they are created at each level. Otherwise
the data would be lost in local variables.
Wow, I just read
over the last few paragraphs. "What a nerd!" If you made it this far
then more power to you. I think I may have gone beyond the scope of
what I planned to accomplish here. However, if you have any thoughts or
questions, I'd sure like to hear them.
The LOOP (files and
folders) and MENU commands are two more power tools to add to your bag
of AutoHotkey tricks. When combined with other tools many more apps are
possible.
* * *